MediaCP Manual
    1. Getting Started
    2. Sales Questions
    3. Frequently Asked Questions
    4. Transcoder System Benchmarks
    5. Start your own streaming platform
    1. Product Licensing
    2. Change account currency
    1. Introduction
    2. Installation & Upgrade
      1. System Requirements
      2. Versions & Releases
      3. Installation
      4. Upgrading
      5. SSL Certificates
      6. Streaming Servers
        1. Nginx-Rtmp Video Server
        2. Wowza Streaming Engine
        3. Flussonic Media Server
        4. Video Feature Comparison
        5. Icecast 2 / Icecast KH
        6. Shoutcast 2
    3. Billing Integration
      1. Clientexec Integration Guide
      2. Blesta Integration Guide
      3. WiseCP Integration Guide
      4. WHMCS Integration Guide
    4. Migrate from other software
      1. Migrate From AzuraCast
      2. Migrate From Centovacast
    5. Backup & Restoration
      1. Backup MediaCP
      2. Restore MediaCP
      3. Transfer to another server
    6. Administration
      1. MediaCP System Commands
      2. Admin Tools
      3. Custom Web Service Configurations
      4. Change MediaCP domain name
      5. Port 80 / 443 Proxy
      6. Move media to another hard disk
      7. Custom Language Translations
      8. Custom Facebook App
      9. Secure your server
      10. Setup CSF Firewall
      11. Troubleshooting Login Errors
      12. Reset Admin Password
    7. Scaling
      1. Nginx-Rtmp with CloudFront CDN
      2. Scale with Wowza and CloudFront CDN
    8. Troubleshooting
      1. Troubleshooting Wowza Streaming Engine
      2. FTP Troubleshooting
      3. MySQL Database Troubleshooting
      4. Reporting Troubleshooting
      5. Troubleshooting Liquidsoap AutoDJ
      6. Video Relay Troubleshooting
      7. Grant access to support team
    1. Introduction
    2. Administrators Dashboard
    3. System Configuration
      1. General
      2. Services
      3. Video Players
      4. Albums
      5. Email
      6. Plugins
      7. Statistics
      8. Backups
      9. Custom HTML
      10. Misc
    4. Customer Accounts
      1. Managing existing Customers
      2. Create a new Customer
      3. Deleting a Customer
      4. Login as another Customer
      5. Send email to Customer
      6. Reset Customer Password
    5. Reseller Accounts
      1. Create a Reseller Account
      2. Reseller Plans
    6. Administrator Accounts
      1. Create a new Administrator
    7. Media Services
      1. Creating a Media Service
      2. Deleting a Media Service
    8. Announcements
      1. Managing Announcements
      2. Creating Announcement
      3. Deleting Announcement
    9. Statistics
    10. Software Health
    11. Software Updates
    12. Email Templates
    13. API
    1. Introduction
    2. Audio Operation Manual
      1. Basics 101
      2. Station Overview
      3. Media Library
      4. Playlists
        1. General Rotation
        2. Jingles & Advertising
        3. Scheduling
        4. Repeat Protection
      5. Live DJ Connections
      6. Live Stream Recording
      7. DJ Manager
      8. Country Blocking
      9. Fallback, Backup and Intro Files
      10. HTML5 Player
      11. Stream Authentication
      12. Stream Proxy
      13. Public Page
      14. Widgets & Links
      15. Reporting
    3. Video Operation Manual
      1. Basics 101
      2. Service Overview
      3. File Manager
      4. Scheduling
      5. Streaming to Your Service
      6. Stream Targets
      7. GeoIP Country Locking
      8. Public Page
      9. Widgets & Links
      10. Reporting
    4. Reseller Operations Manual
      1. Reseller Dashboard
      2. Customers
      3. Media Services
    5. API
    1. Shoutcast 2 Admin Guide
    2. Wowza and Flussonic on same system
    3. Submit a feature request
    4. Custom Domain Names
    1. Getting started with Audio Streaming
    2. Icecast Live Broadcasting
    3. Shoutcast 2 Live Broadcasting
    4. Broadcasting with AutoDJ
    5. DJ Accounts
    6. GeoIP Country Locking
    7. HTML5 Audio Player
    8. Mount Points
    9. Managing Your Media
    10. Managing Media Using FTP
    11. Statistics
    12. Shoutcast 2 Premium
    1. Getting started with video streaming
    2. Live Streaming Overview
    3. TV Station Overview
    4. Ondemand Video Streaming
    5. GeoIP Country Locking
    6. VAST Advertising
    7. Relay & IP Camera
    8. Stream Recording
    9. Connecting your encoder
    10. Preparing Your Media Files
    11. Managing Media Using FTP
    12. Understanding Video Playlists
    13. Embedding player on your website
    14. Smooth Streaming and Content Transition
    15. Video Transcoding (Adaptive Bitrate Streaming)
    16. Stream Watermark​
    17. DVR Rewind
    18. Statistics
    19. Facebook Live Streaming
    20. Youtube Stream Publishing
    21. Twitch Stream Publishing
    22. Shoutcast 2 Stream Publishing
    23. Icecast Stream Publishing
    24. RTMP Stream Publishing
    1. Cloud Video Overview
    2. Admin Manual - Cloud Video
      1. Dashboard - A First Look
      2. Branding your platform
      3. Team & Staff Members
      4. Plans & Customers
      5. WHMCS Billing Provisioning Module
      6. Login to your cloud platform
      7. Activating VOD on Customer Plan
      8. API
    3. User Manual - Cloud Video
      1. Login to your video platform
      2. First Look
      3. Creating a Channel
      4. Channel Overview
      5. Broadcasting
      6. Recording
      7. Media Content
      8. Live Events
      9. Fallback Video
      10. 30 Minute Rewind
      11. TV Channels - 24x7 UGC
        1. TV Event Scheduling
      12. Video on Demand
      13. Relay Channels
      14. VOD Playlists
      15. Publishing
      16. Bandwidth Utilisation
      17. Viewing Analytics
      18. Publish Zoom Meetings
      19. Advertising
      20. Restreaming IP Cameras
    4. Video Guide Series
    5. Streaming Best Practices
    6. Feature Comparison
    7. Roadmap & Release Notes
Video on Demand

Last updated 2 months ago

Video Ondemand Streaming is a technology that allows users to watch video content whenever they want, without having to download or store it on their devices. Users can access video content from various platforms, such as websites, apps, or smart TVs, and stream it over the internet. VOD has many purposes, such as entertainment, education, communication, and marketing, and is used for a wide range of different content such as movies, TV shows, documentaries, live events, webinars, tutorials, podcasts, and more.

The main purpose of Video Ondemand Streaming is to provide convenience and flexibility to users. Users can choose what they want to watch, when they want to watch it, and how they want to watch it. Users can also pause, rewind, fast-forward, or skip the video content as they wish.

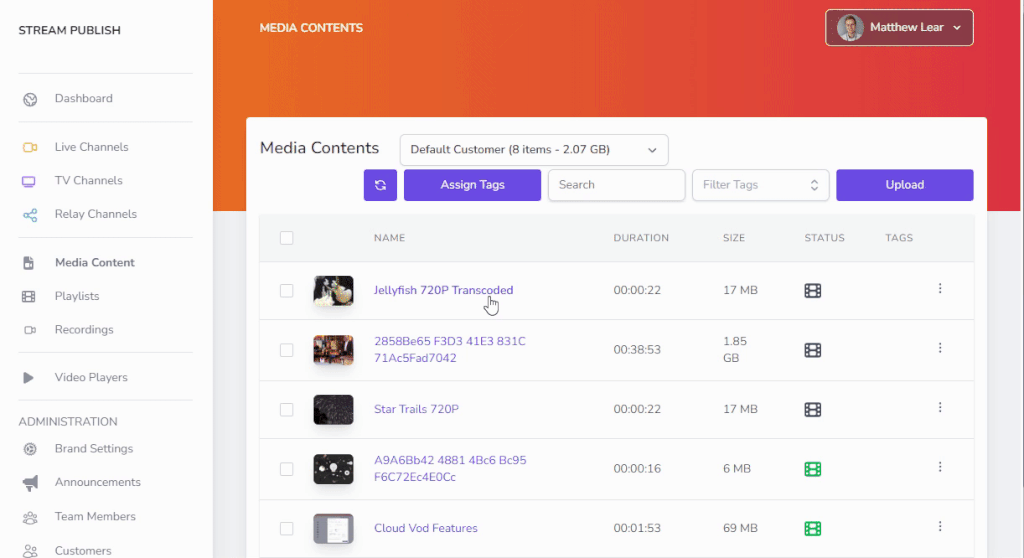
Video Ondemand provides new features to upload, centralize, and publish your video collection. Once the feature is activated on your plan, there will be 3 notable changes:

  1. Media Content will show a new film roll icon indicating VOD published
  2. New Playlists item in the side menu appears
  3. Analytics will show “VOD” usages in a separate bar

Features Overview

  • Easy to use Media Manager with drag-and-drop support to upload your library of media
  • Automatic cloud-based transcoding, packaging, and playback in adaptive formats
  • A publicly available hosted page to playback a video or playlist of videos
  • A publicly available hosted CMS to playback multiple videos
  • Video Analytics providing unique viewer numbers and bandwidth consumption
  • Global Streaming via CDN to anywhere in the world
  • Brandable and Customisable Video Player

Uploading VOD Content for Publishing

  1. Press the Upload button in the top right of the interface
  2. Drag and drop one or more files from your desktop into the field designating upload. It is important to drop files into this field and no where else on the screen.
  3. Do not close the window until all files have uploaded successfully.
  4. Once all files are uploaded, processing of the file into multiple adaptive formats will begin. 

Enable VOD Publishing on existing content

  1. Navigate to Media Contents
  2. Click on the name of an item
  3. Check the Published toggle
  4. Click “Save
  5. Processing will begin immediately

Table of Contents