MediaCP Manual
    1. Getting Started
    2. Sales Questions
    3. Frequently Asked Questions
    4. Transcoder System Benchmarks
    5. Start your own streaming platform
    1. Change account currency
    2. Product Licensing
    1. Introduction
    2. Installation & Upgrade
      1. System Requirements
      2. Versions & Releases
      3. Installation
      4. Upgrading
      5. Streaming Servers
        1. Nginx-Rtmp Video Server
        2. Wowza Streaming Engine
        3. Flussonic Media Server
        4. Video Feature Comparison
        5. Icecast 2 / Icecast KH
      6. SSL Certificates
    3. Billing Integration
      1. WHMCS Integration Guide
      2. Clientexec Integration Guide
      3. Blesta Integration Guide
    4. Migrate from other software
      1. Migrate From Centovacast
      2. Migrate From AzuraCast
    5. Backup & Restoration
      1. Backup MediaCP
      2. Restore MediaCP
      3. Transfer to another server
    6. Administration
      1. Move media to another hard disk
      2. Secure your server
      3. Troubleshooting Login Errors
      4. Custom Facebook App
      5. Custom Web Service Configurations
      6. Reset Admin Password
      7. Port 80 / 443 Proxy
      8. MediaCP System Commands
      9. Change MediaCP domain name
      10. Admin Tools
    7. Scaling
      1. Scale with Wowza and CloudFront CDN
      2. Nginx-Rtmp with CloudFront CDN
    8. Troubleshooting
      1. Troubleshooting Liquidsoap AutoDJ
      2. Video Relay Troubleshooting
      3. Grant access to support team
      4. Troubleshooting Wowza Streaming Engine
      5. FTP Troubleshooting
      6. MySQL Database Troubleshooting
      7. Reporting Troubleshooting
    1. Introduction
    2. Administrators Dashboard
    3. System Configuration
      1. General
      2. Services
      3. Video Players
      4. Albums
      5. Email
      6. Plugins
      7. Statistics
      8. Backups
      9. Custom HTML
      10. Misc
    4. Customer Accounts
      1. Managing existing Customers
      2. Create a new Customer
      3. Deleting a Customer
      4. Login as another Customer
      5. Send email to Customer
      6. Reset Customer Password
    5. Reseller Accounts
      1. Reseller Plans
      2. Create a Reseller Account
    6. Media Services
      1. Creating a Media Service
      2. Deleting a Media Service
    7. Announcements
      1. Managing Announcements
      2. Creating Announcement
      3. Deleting Announcement
    8. Statistics
    9. Software Health
    10. Software Updates
    11. Email Templates
    12. API
    1. Introduction
    2. Audio Operation Manual
      1. Basics 101
      2. Station Overview
      3. Media Library
      4. Playlists
        1. General Rotation
        2. Jingles & Advertising
        3. Scheduling
        4. Repeat Protection
      5. Live DJ Connections
      6. Live Stream Recording
      7. DJ Manager
      8. Country Blocking
      9. Stream Proxy
      10. Public Page
      11. HTML5 Player
      12. Stream Authentication
      13. Widgets & Links
      14. Reporting
    3. Video Operation Manual
      1. Basics 101
      2. Service Overview
      3. File Manager
      4. Scheduling
      5. Stream Targets
      6. Streaming to Your Service
      7. GeoIP Country Locking
      8. Widgets & Links
      9. Reporting
    4. Reseller Operations Manual
      1. Reseller Dashboard
      2. Customers
      3. Media Services
    1. Wowza Custom Properties
    2. API Documentation
    3. Custom Domain Names
    4. Shoutcast 2 Admin Guide
    5. Wowza and Flussonic on same system
    6. Submit a feature request
    1. Mount Points
    2. Managing Media Using FTP
    3. Shoutcast 2 Live Broadcasting
    4. DJ Priorities
    5. HTML5 Audio Player
    6. Broadcasting with AutoDJ
    7. Shoutcast 2 Premium
    1. Getting started with video streaming
    2. Live Streaming Overview
    3. TV Station Overview
    4. Ondemand Video Streaming
    5. GeoIP Country Locking
    6. VAST Advertising
    7. Relay & IP Camera
    8. Stream Recording
    9. Connecting your encoder
    10. Preparing Your Media Files
    11. Managing Media Using FTP
    12. Understanding Video Playlists
    13. Embedding player on your website
    14. Smooth Streaming and Content Transition
    15. Video Transcoding (Adaptive Bitrate Streaming)
    16. Image Logo or Watermark Overlay on Video Stream
    17. DVR Rewind
    18. Statistics
    19. Facebook Live Streaming
    20. Youtube Stream Publishing
    21. Twitch Stream Publishing
    22. Shoutcast 2 Stream Publishing
    23. Icecast Stream Publishing
    24. RTMP Stream Publishing
    1. Cloud Video Overview
    2. Admin Manual - Cloud Video
      1. WHMCS Billing Provisioning Module
      2. Login to your cloud platform
      3. Dashboard - A First Look
      4. Branding your platform
      5. Team & Staff Members
      6. Plans & Customers
      7. Activating VOD on Customer Plan
    3. User Manual - Cloud Video
      1. Login to your video platform
      2. First Look
      3. Creating a Channel
      4. Channel Overview
      5. Broadcasting
      6. Recording
      7. Media Content
      8. Fallback Video
      9. TV Channels - 24x7 UGC
      10. Video on Demand
      11. VOD Playlists
      12. Publishing
      13. Viewing Analytics
      14. Publish Zoom Meetings
      15. Advertising
      16. Restreaming IP Cameras
    4. Video Guide Series
    5. Streaming Best Practices
    6. Feature Comparison
    7. Roadmap & Release Notes
Clientexec Integration Guide

Last updated 4 weeks ago

Clientexec is a third-party software that compliments the Media Control Panel with a a billing and automation component for the primary purpose of selling audio and video streaming services. 

Clientexec is licensed and installed separately to Media Control Panel. Please refer to the Clientexec website for information on pricing and installation.

Installation

The Clientexec plugin is maintained publicly at https://github.com/mediacontrolpanel/clientexec-onpremise/

  1. Download the latest plugin from GitHub
  2. Extract the .zip file to your desktop
  3. Connect to your ClientExec server via FTP and navigate to [Clientexec]/plugins/server
  4. Upload the mediacp folder from your desktop to the FTP in the path [Clientexec]/plugins/server


Configuration

Add a new server

Once the plugin is installed it will immediately be visible from the Plugin list within the Edit Server screen of Clientexec.

  1. Login to Clientexec as an administrator
  2.  Navigate to Settings -> Servers
  3. Click on Add Server
  4. Below are described the fields that are relevant to Media Control Panel.
    • Server Name: This is for your own identification, enter any name that you want.
    • Hostname: Enter the domain name used by Media Control Panel. Make sure it is only the host/domain component and not a URL. It should not include https:// or the port number
    • Plugin: Select Media Control Panel from the drop down menu
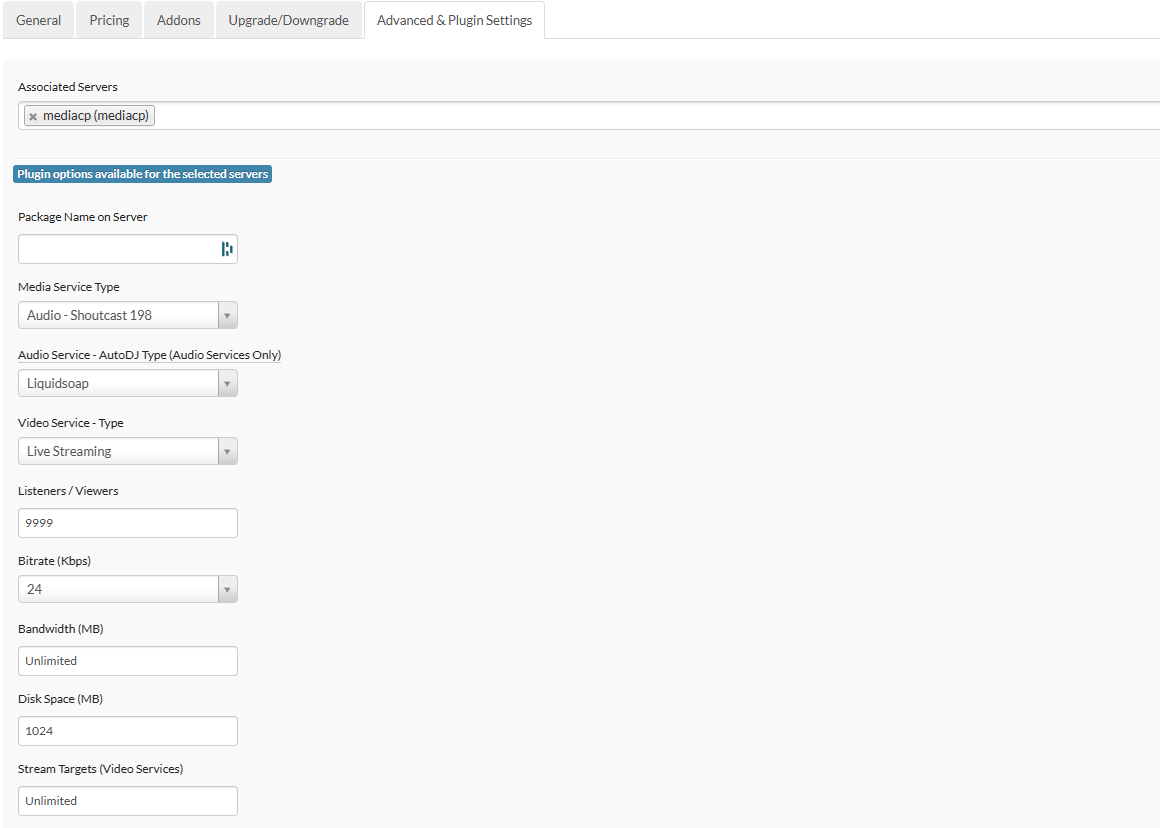
    • Plugin Options – Port: The primary port that MediaCP software uses. Default is 2020. Change only if you have configured an alternate port for MediaCP Web.
    • Plugin Options – Use SSL: Check this box if HTTPS/SSL is configured with MediaCP (default ON).
    • Plugin Options – API Key: Provide the MediaCP API Key into this field
    • Plugin Options – Service Name Custom Field: Leave as the default value of “Service Name” unless you change this in the next step.
  5. Press on Save Changes, and then Test Connection to make sure everything is working appropriately before continuing.

If you run into connection issues, we recommend creating a service in your panel manually and retesting. Please contact our helpdesk if this does not fix the connection.

Configure Custom Fields

Custom Fields are required to save information to be used in the Email Template described further below. 

  1.  Navigate to the Main Menu -> Settings -> Custom Fields
  2. Press Add Custom Field
  3. Enter the name of the new custom field as “Service Name” and press OK to continue.
  4. Check “Is Required”
  5. Check “Include in Signup”
  6. Uncheck “All Product Groups”
  7. Repeat the process and create three additional fields called “Service Portbase”, “Service Password”, and “Customer Password” however make sure “Required” and “Include in Signup” is UNCHECKED and that you do CHECK the Admin Only option.

Create Welcome Email

  1. Navigate to Main Menu -> Settings -> Email Templates
  2. Fill out the Email name & Subject as desired
  3. Ensure the Type is set to “Welcome Email”
  4. Use one of the the below emails as a template to getting started

Email Template - Generic

Dear [CLIENTNAME],

Thank you for choosing [COMPANYNAME] to be your hosting provider. This email contains the details and credentials you need to make use of your hosting account.

New Account Information:

Control Panel Login: https://[SERVERHOSTNAME]:2020
Control Panel Username: [DOMAINUSERNAME]
Control Panel Password: [CUSTOMPACKAGE_Customer Password]

Reset Password: https://[SERVERHOSTNAME]:2020/index.php?page=login&action=forgot.password

If you have any questions, please don’t hesitate to let us know by emailing [SUPPORTEMAIL].
Thank you,
[COMPANYNAME]

Email Template - Audio Services

Dear [CLIENTNAME],

Thank you for choosing [COMPANYNAME] to be your hosting provider. This email contains the details and credentials you need to make use of your hosting account.

New Account Information:

Control Panel Login: https://[SERVERHOSTNAME]:2020
Control Panel Username: [DOMAINUSERNAME]
Control Panel Password: [CUSTOMPACKAGE_Customer Password]

Reset Password: https://[SERVERHOSTNAME]:2020/index.php?page=login&action=forgot.password

Audio Service Details

URL: https://[SERVERHOSTNAME]:[CUSTOMPACKAGE_Service Portbase]
Broadcast Port: [CUSTOMPACKAGE_Service Portbase]
Broadcast Password: [CUSTOMPACKAGE_Service Password]

If you have any questions, please don’t hesitate to let us know by emailing [SUPPORTEMAIL].
Thank you,
[COMPANYNAME]

Create Product Group

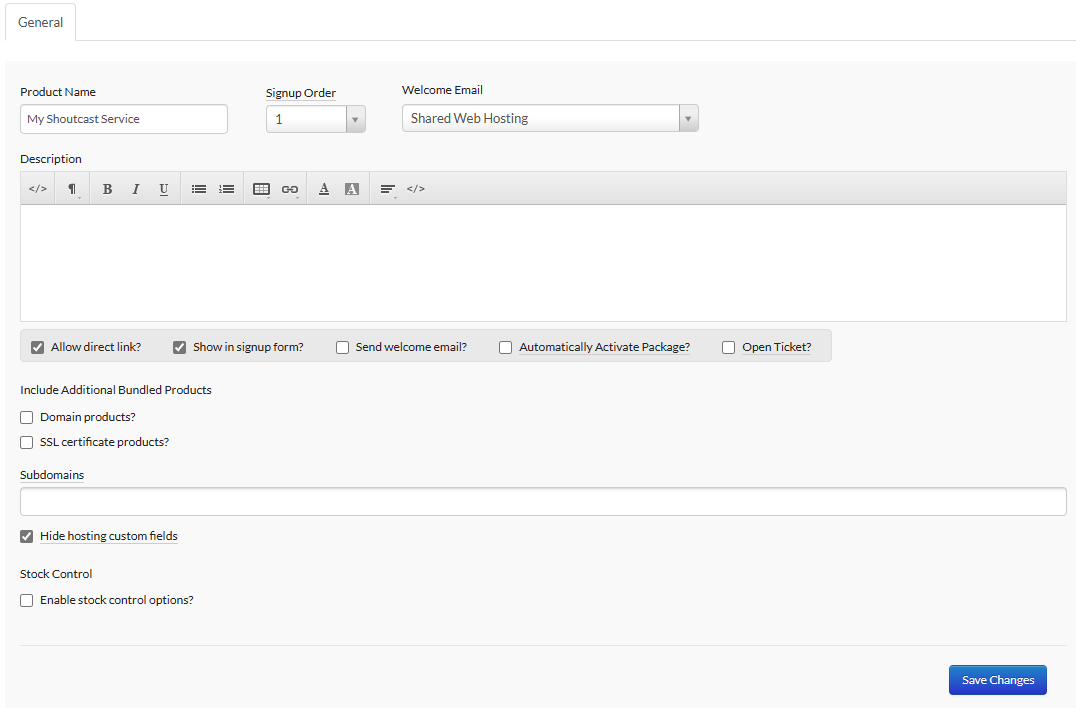
It is required to create a new Product Group that will hold Packages for the Media Control Panel product. This enables us to configure the group with Custom Fields as defined in the last step.

  1.  Navigate to the Main Menu -> Products
  2.  Select “Add Product Group”
  3. Enter Media Control Panel as the group name
  4. Set the Product Group Type to “Hosting”
  5. The only important configurations here are the Custom Fields, add the “Service Name”, “Service Portbase”, “Service Password”, and “Customer Password”.

Create the first product

Add A New Product

  1. Select the Create a new product button
  2. Enter a Product Name for your customers to see
  3. Select the MediaCP Welcome Email
  4. Check “Send welcome email?” to automatically send the welcome email when the service is provisioned
  5. Select “Hide hosting custom fields” to ensure customers do not fill out these fields.
  6. Save Changes

Configure Product

  1. Select the “Pricing” tab and configure at least one price allowed in signup 
  2. Select the “Advanced & Plugin Settings” tab
  3. Select the Associated Server utilizing the “mediacp” server plugin
  4. Fill out the options for the service as you wish to be created in the Media Control Panel
  5. Ensure that you only select Service Types that are enabled in your panel
  6. Press Save Changes

Troubleshooting

If you are hitting issues with connecting ClientExec with MediaCP or anything else then please review this KB Article: https://www.mediacp.net/portal/index.php/knowledgebase/137/ClientExec-Troubleshooting.html

Table of Contents