MediaCP Manual
    1. Getting Started
    2. Sales Questions
    3. Frequently Asked Questions
    4. Transcoder System Benchmarks
    5. Start your own streaming platform
    1. Change account currency
    2. Product Licensing
    1. Introduction
    2. Installation & Upgrade
      1. System Requirements
      2. Versions & Releases
      3. Installation
      4. Upgrading
      5. Streaming Servers
        1. Nginx-Rtmp Video Server
        2. Wowza Streaming Engine
        3. Flussonic Media Server
        4. Video Feature Comparison
        5. Icecast 2 / Icecast KH
      6. SSL Certificates
    3. Billing Integration
      1. WHMCS Integration Guide
      2. Clientexec Integration Guide
      3. Blesta Integration Guide
    4. Migrate from other software
      1. Migrate From Centovacast
      2. Migrate From AzuraCast
    5. Backup & Restoration
      1. Backup MediaCP
      2. Restore MediaCP
      3. Transfer to another server
    6. Administration
      1. Custom Web Service Configurations
      2. Reset Admin Password
      3. Port 80 / 443 Proxy
      4. MediaCP System Commands
      5. Change MediaCP domain name
      6. Move media to another hard disk
      7. Secure your server
      8. Troubleshooting Login Errors
      9. Custom Facebook App
      10. Admin Tools
    7. Scaling
      1. Scale with Wowza and CloudFront CDN
      2. Nginx-Rtmp with CloudFront CDN
    8. Troubleshooting
      1. Grant access to support team
      2. Troubleshooting Wowza Streaming Engine
      3. FTP Troubleshooting
      4. MySQL Database Troubleshooting
      5. Reporting Troubleshooting
      6. Troubleshooting Liquidsoap AutoDJ
      7. Video Relay Troubleshooting
    1. Introduction
    2. Administrators Dashboard
    3. System Configuration
      1. General
      2. Services
      3. Video Players
      4. Albums
      5. Email
      6. Plugins
      7. Statistics
      8. Backups
      9. Custom HTML
      10. Misc
    4. Customer Accounts
      1. Managing existing Customers
      2. Create a new Customer
      3. Deleting a Customer
      4. Login as another Customer
      5. Send email to Customer
      6. Reset Customer Password
    5. Reseller Accounts
      1. Reseller Plans
      2. Create a Reseller Account
    6. Media Services
      1. Creating a Media Service
      2. Deleting a Media Service
    7. Announcements
      1. Managing Announcements
      2. Creating Announcement
      3. Deleting Announcement
    8. Statistics
    9. Software Health
    10. Software Updates
    11. Email Templates
    12. API
    1. Introduction
    2. Audio Operation Manual
      1. Basics 101
      2. Station Overview
      3. Media Library
      4. Playlists
        1. General Rotation
        2. Jingles & Advertising
        3. Scheduling
        4. Repeat Protection
      5. Live DJ Connections
      6. Live Stream Recording
      7. DJ Manager
      8. Country Blocking
      9. Stream Authentication
      10. Stream Proxy
      11. Widgets & Links
      12. Reporting
    3. Video Operation Manual
      1. Basics 101
      2. Service Overview
      3. File Manager
      4. Scheduling
      5. Streaming to Your Service
      6. Stream Targets
      7. GeoIP Country Locking
      8. Widgets & Links
      9. Reporting
    4. Reseller Operations Manual
      1. Reseller Dashboard
      2. Customers
      3. Media Services
    1. API Documentation
    2. Custom Domain Names
    3. Shoutcast 2 Admin Guide
    4. Wowza and Flussonic on same system
    5. Submit a feature request
    6. Wowza Custom Properties
    1. Shoutcast 2 Live Broadcasting
    2. DJ Priorities
    3. HTML5 Audio Player
    4. Broadcasting with AutoDJ
    5. Shoutcast 2 Premium
    6. Mount Points
    7. Managing Media Using FTP
    1. Getting started with video streaming
    2. Live Streaming Overview
    3. TV Station Overview
    4. Ondemand Video Streaming
    5. Stream Recording
    6. GeoIP Country Locking
    7. VAST Advertising
    8. Relay & IP Camera
    9. Connecting your encoder
    10. Preparing Your Media Files
    11. Managing Media Using FTP
    12. Understanding Video Playlists
    13. Embedding player on your website
    14. Smooth Streaming and Content Transition
    15. Video Transcoding (Adaptive Bitrate Streaming)
    16. Image Logo or Watermark Overlay on Video Stream
    17. Statistics
    18. DVR Rewind
    19. Facebook Live Streaming
    20. Youtube Stream Publishing
    21. Twitch Stream Publishing
    22. Shoutcast 2 Stream Publishing
    23. Icecast Stream Publishing
    24. RTMP Stream Publishing
    1. Cloud Video Overview
    2. Admin Manual - Cloud Video
      1. Login to your cloud platform
      2. Dashboard - A First Look
      3. Branding your platform
      4. Team & Staff Members
      5. Plans & Customers
      6. WHMCS Billing Provisioning Module
      7. Activating VOD on Customer Plan
    3. User Manual - Cloud Video
      1. Login to your video platform
      2. First Look
      3. Creating a Channel
      4. Channel Overview
      5. Broadcasting
      6. Media Content
      7. Recording
      8. Fallback Video
      9. TV Channels - 24x7 UGC
      10. Video on Demand
      11. VOD Playlists
      12. Publishing
      13. Viewing Analytics
      14. Publish Zoom Meetings
      15. Advertising
      16. Restreaming IP Cameras
    4. Video Guide Series
    5. Streaming Best Practices
    6. Feature Comparison
    7. Roadmap & Release Notes
Wowza Streaming Engine

Last updated 3 months ago

MediaCP provides a beautiful user-friendly interface as well as a large offering of additional functionality to Wowza Streaming Engine, with a direct integration via REST API.  The Media Control Panel supports Wowza Streaming Engine version 4.8.25+

Read more about features available in MediaCP

Is version 4.x.x supported by MediaCP?

Our engineers aim to provide support for the most recent versions of Wowza Streaming Engine soon after they are made available however the latest versions will be supported approximately 2-3 weeks after release. You can find the latest supported version on our Versions & Releases page.

How to Install Wowza Streaming Engine

WSE is not installed already

The following steps will install Wowza Streaming Engine onto your server and automatically integrate it with MediaCP software.

  1. Login to your server SSH as root user
  2. Run the following command:
    /root/init wse-install

    If WSE is already installed, then you should instead run the following to automatically configure the existing Wowza installation:

     /root/init wse-config
  3. Now you will be able to create new Wowza services directly from the MediaCP.

WSE is already installed on the system

If you have already installed Wowza Streaming Engine on your server and wish to integrate it with MediaCP software then it is only required to run the configuration utility:

  1. Login to your server SSH as root user
  2. Run the following command:
    /root/init wse-config

Reinstall Wowza Streaming Engine

If you have already installed Wowza Streaming Engine on your server and wish to reinstall then you will need to uninstall, then install using our utility:

  1. Login to your server SSH as root user
  2. Follow Wowza’s guide to uninstall WSE: https://www.wowza.com/docs/uninstall-wowza-streaming-engine
  3. Run the following command:
    /root/init wse-install

What changes are made to Wowza by MediaCP?

Generally we try to keep it simple and as close to a default WSE installation as possible, however there are several changes that our software makes during the installation process:

  • Automatic configuration of port 1936 for SSL services
  • Automatic configuration of port 554 on the default VHost
  • Automatic configuration of SSL for WSE Manager on port 8089
  • Automatic configuration of Production mode, where the default installation is in a development mode.
  • Installation of additional modules for TV Station and other functionality

StreamLock Certificates

The Wowza StreamLock Certificate lasts for 12 months, you will need to setup a reminder in 11 months to renew the certificate. We will not remind you. Renewing the certificate is a manual process and we also have a guide on this page.

Our support team can install and renew a certificate for you at an additional service cost.

Create & Install Certificate

Request and download a StreamLock certificate

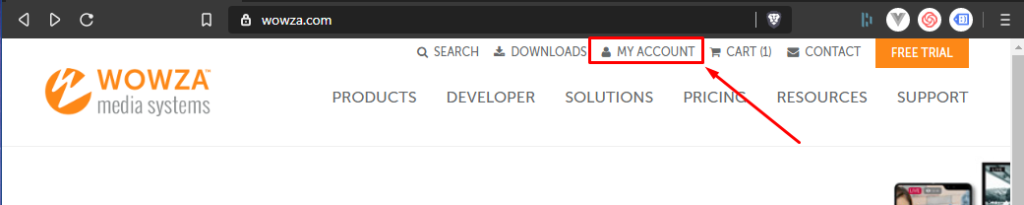
  1. Login to your Wowza Streaming Engine ‘My Account‘ page.
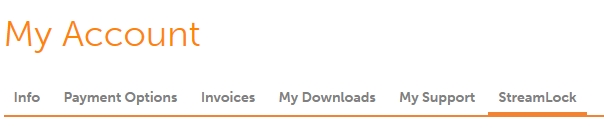
  2. Click on the ‘StreamLock‘ tab
  3. Fill in your License KeyIP Address and enter any password to secure your certificate.
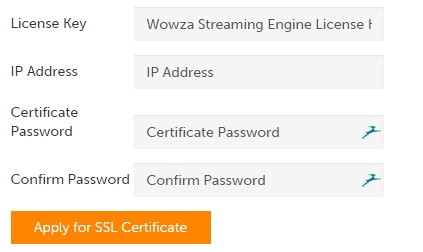
  4. Click ‘Apply for SSL Certificate‘.
  5. Download your new certificate
  6. Upload the file to your server in the following path:
    /usr/local/WowzaStreamingEngine/conf/

Configure Wowza Streaming Engine to use your StreamLock certificate

  1. Login to Wowza Streaming Engine Manager at http://your-domain:8088/engine-manager/
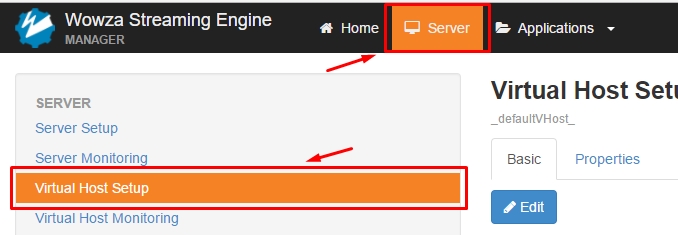
  2. Click on the Server tab then select Virtual Host Setup.

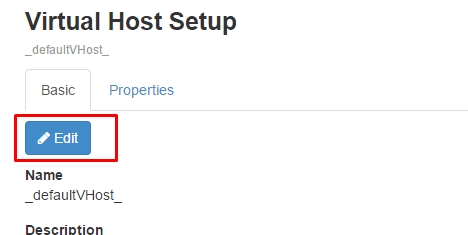
  3. Click on the Edit button under the Virtual Host Setup Basic tab.
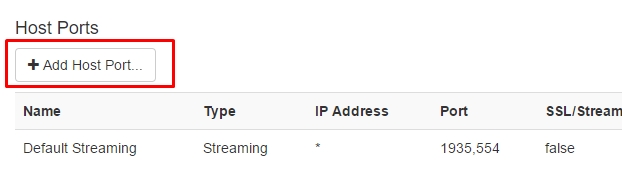
  4. Scroll down and select Add Host Port

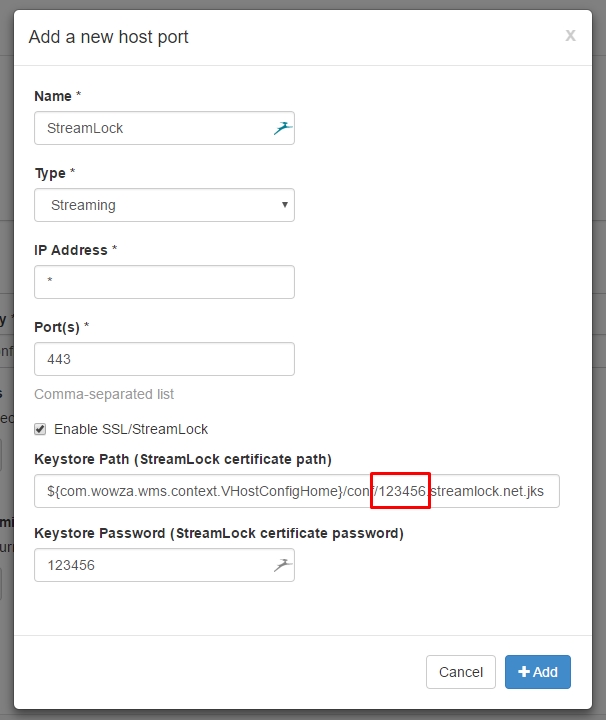
  5. Fill out the form as illustrated below, replacing the Keystore path with the appropriate file name and Keystore Password with your previously configured password then press Add.
    Keystore path should be ${com.wowza.wms.context.VHostConfigHome}/conf/[your-id].streamlock.net.jks

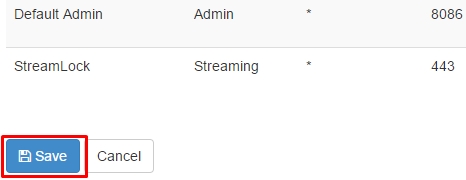
  6. Click the Save button under Host Ports
  7. Restart Wowza Streaming Engine as prompted at the top of the screen

Configure MediaCP to use your new secure StreamLock address

  1. Login to the MediaCP as an administrator.
  2. Navigate to System Config from the side menu
  3. Select the Plugins tab
    Image 2023-07-07 at 2.04.59 PM

  4. Enter your Stream Lock ID in the provided field and change your Secure Streaming Port to the port you selected for Streamlock
    Image 2023-07-07 at 2.00.56 PM
  5. Scroll to the bottom of the page and Save Configuration

Test Stream Lock

  1. Navigate to Services and select or create a Wowza Ondemand Service
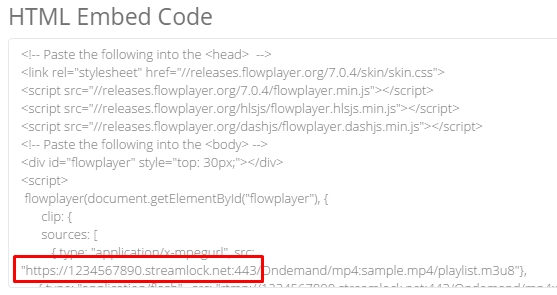
  2. Open the HTML Embed Code tab and confirm the embed code includes your stream lock address
  3. Press play on the media player to start your ondemand stream.


Renew Certificate

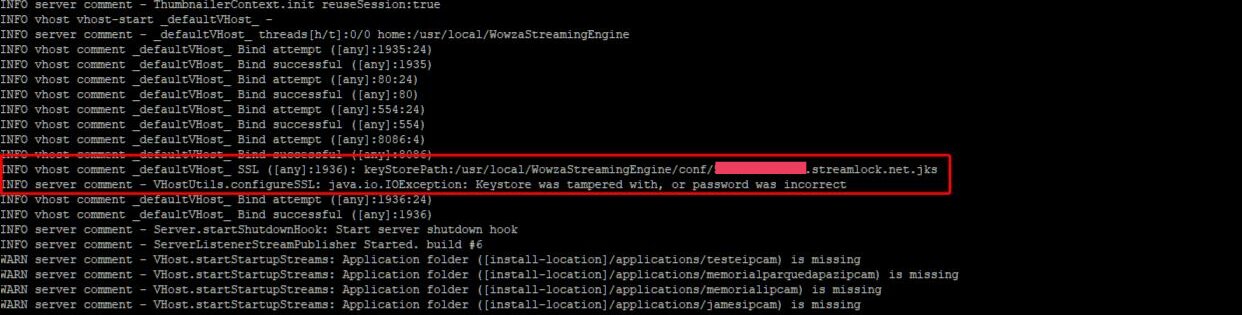
It is required to renew your StreamLock certificate every 12 months. You should receive an email from Wowza Streaming Engine before it is due for renewal, if you do not please exclude Wowza from your junk mail.

Step 1 – Download StreamLock Certificate

  1. Login to the Wowza Portal “My Account”

  2. Select StreamLock tab
  3. Scroll to the bottom of the page, locate your SSL certificate and press the Renew link.
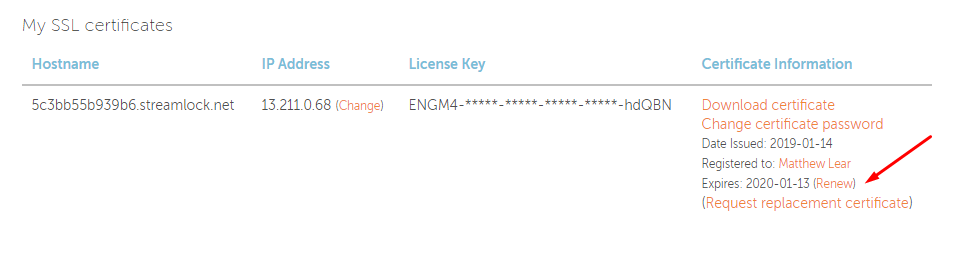
  4. Once the renewal is completed, press the Download Certificate link to download to your computer.

    It is important the file is saved as your hostname with .jks extension. For example abcdefg.streamlock.net.jks.

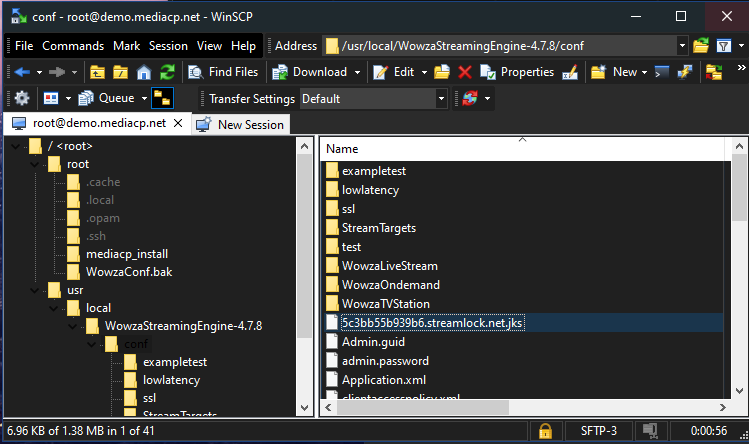
Step 2 – Upload Certificate to your server

You will need to connect to your server via SFTP with your SSH root details. We recommend to download WinSCP.

  1. Open WinSCP and enter your root SSH connection details

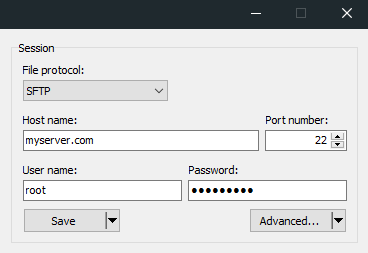
  2. Navigate to /usr/local/WowzaStreamingEngine/conf/
  3. Upload your streamlock file, replacing the existing file.

Step 3 – Restart Wowza Streaming Engine

  1. Login to your Server via SSH
  2. Issue the following command:
    systemctl restart WowzaStreamingEngine;

Change Wowza License Key

1. Login to your server via SSH

2. Run the following command:

nano /usr/local/WowzaStreamingEngine/conf/Server.license

3. Remove the old license key and paste your new license.

4. Save and restart Wowza Streaming Engine.with the command below:

systemctl restart WowzaStreamingEngine;

Table of Contents